Advent calendar is one of the most special resources when the time of Christmas arrives. This calendar allows us to learn how many days are left to celebrate these special days with our loved ones by counting down the days. For children, this turns into a game filled with magic, surprises, and excitement.
The Advent Calendar, a very popular type of calendar, is not only perfect for counting down but also for decorating the home, office, or classroom. In this article, you will learn step by step how to make a beautiful calendar that you can create with children at home or school. You will also find extra ideas to fill it, adapt it to family activities, and make it a unique Christmas tradition each year.
History of the Advent Calendar
The Advent Calendar has been used in Germany since the 19th century. In the early days, small children would light a candle every day to reach Christmas day. This was a simple and visual way to mark the waiting period until Christmas day.
Over time, this tradition evolved. In the early 20th century, paper calendars with numbered windows that opened each day began to appear. Later, chocolate calendars became popular, which contained small chocolates or candies behind each window. From this point on, the tradition spread worldwide, and the contents of each box began to be personalized.
With this evolution, the tradition of hiding small surprises each day was born: candies, chocolates, stickers, mini toys, positive messages, family activities, or small symbolic details. The aim is for each day in December to be a special moment for children and the whole family.
Today, Advent calendars are quite diverse: there are commercial versions such as makeup, toys, tea, cosmetics, or snacks, and even digital versions are available. However, handmade calendars are still the cutest, as they can be completely tailored to children's tastes and can become a creative and educational project.
Therefore, if you want your calendar to be original and customizable, I recommend making your own Advent Calendar with foam and cardboard. Below, you will find a very comprehensive and easy idea that can be adapted to any home or classroom.
Materials for Making an Advent Calendar
To make this Advent Calendar with children, you will need simple and economical materials. You can probably find many of them at home.
- Cardboard (can be recycled from boxes as long as it is clean and sturdy).
- Sharp scissors, suitable for cutting cardboard and foam.
- Glue (liquid or stick) and hot glue if possible (should always be used by an adult).
- Foam in different colors (plain and if available, glittery for bright details).
- Foam punches (in shapes like heart, star, circle, snowflake, etc.).
- Cookie cutters (in shapes like heart, circle, star, etc.) to use as templates.
- Permanant marker and colored pens to write numbers and decorative details.
- Trapillo or string to hang the calendar (optional if you want to hang it on the wall).
- Masking tape or strong adhesive tape to reinforce some parts of the panel.
- Christmas patterned wrapping paper or plain colors that match the decoration.
- White glue and a brush or to stick large paper surfaces to cardboard.
- Decorative papers (scrapbooking, patterned cardboard, or colored papers).
- Polystyrene (porexpán) to create a snow-covered ground effect.
- Small pom poms to add volume and texture to the decoration.
- Lipstick and a cotton swab to color the figures (for example, penguin).
With this base, you can create a very comprehensive calendar. If you want, you can also add Christmas stickers, satin ribbons, glitter, buttons, or other decorative details from your craft box. The important thing is that the result is colorful, attractive, and durable so that it can withstand well throughout December.
Advent Calendar Preparation Process
The preparation process is divided into two main parts: on one hand, the creation of numbered cards or pockets, and on the other hand, the construction of the panel where the calendar will be placed. This way, you can organize working with children and do it several times without it being boring.
Design and Preparation of the Cards
- First, we should choose our favorite decorative papers. The red and green tones are perfect for Christmas, but you can also combine gold, silver, or white for contrast.
- Next, we cut 25 cards each measuring 8 x 10 cm. These will be the card pockets where we will place the surprises for each day.
- The basic tools we will use will be cookie cutters and foam punches, allowing us to create perfect shapes quickly and fun for the children.
- We will start designing the cards and create 3 different models, but you can combine them and create new cards so that no two are the same.
Model 1: Heart Card
- Using a cookie cutter, cut a heart from the foam and cut it carefully.
- Glue the heart onto the decorative paper, centering it or placing it in a corner, whichever you prefer.
- With a round punch, cut a semicircle at the top of the card so that it is easier to add and remove surprises.
- With a permanent marker, write the day's number (in this example, 1) clearly and visibly.
- To complete this design, you can glue a small decoration in a corner, like a star or snowflake, to add more of a Christmas vibe.
Model 2: Music Star Card
- To make the second model, cut a large star from the foam.
- Place a musical note or another Christmas-themed figure on that star, contrasting it with a foam of a different color. The gluing and numbering process is the same as in the first card.
Model 3: Heart Circle Card
- In the third model, cut a circle from green foam and glue it in the center of the card.
- Write the day's number inside the circle and glue a red heart made with a foam punch above or below it.
You can create variations from these three basic models: changing colors, using shapes alternatively, adding symbols, combining different decorative papers, or adding the child's name to some cards, thus giving a more personal touch.
Advent Calendar Panel
When your number 25 card is ready, it is time to prepare the structure of the calendar, which is the panel it will be placed on. This section is ideal for working with children on organization and symmetry, helping them understand the distribution of cards and the order of the days.
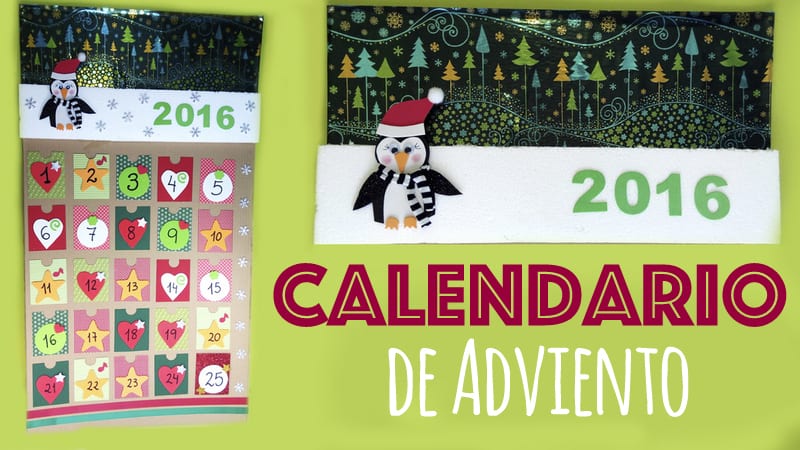
- To create the structure, a cardboard of the dimensions shown in the photo is required (you can adapt it to fit the area where you will place the calendar, such as on a wall, the inside of a door, or on a shelf).
- With masking tape, create two lines on the bottom of the cardboard, leaving about half a centimeter between them. Make sure they are very straight, as these will serve as the visual base of the design.
- Then, cut a strip of gift wrap approximately 60 x 25 centimeters to cover the main part of the panel.
- Dilute white glue slightly and, using a brush or sponge, glue the gift wrap onto the cardboard. Do this carefully to avoid wrinkles; smooth it out from the center to the edges with a soft cloth or towel.
- Now cut a strip of polystyrene measuring 50 x 10 centimeters and glue it on top of the gift wrap to create a snow scene, where you can place figures or decorations.
- Before gluing all the cards, place them on the panel and make sure they are centered and well distributed. It is important to adjust the spacing between rows and columns so that 25 cards can be placed without crowding.
- Once you have clarified the distribution, apply glue or hot silicone to the sides and bottom of each card, leaving the tops open so you can place surprises: candies, treats, messages, activities, etc.
- At this point, the calendar has started to take shape and the integrity of the colors, numbers, and pockets has become visible.
Decorating the Advent Calendar Panel
The final decoration is the most creative and fun part for the children. Here, they can add Christmas characters, write messages, play with textures, and enhance their favorite winter or music theme.
- To continue decorating the calendar, you can use a foam rubber penguin. To learn how to make it, CLICK HERE OR VIEW THE IMAGE.
- This penguin is made of foam rubber, and in the described article, you can download and print the templates, which makes it easier for children to cut out the pieces.
- You can also add foam rubber numbers for the year you are in or a decorative word or phrase (for example, "Christmas" or "Advent"). If the numbers or letters are sticky, no glue is needed; if not, cut them out with scissors and glue them with adhesive or silicone. This option is very practical for adding a recognizable and personal detail to your panel.
- To complete the decoration of the calendar and provide more light, you can make snowflakes with foam eva and stick them to the polystyrene snow landscape and the edges of the cardboard panel.
If you want to continue adding details, you can simulate snowballs by adding pompoms, place string or trapillo at the top to hang the calendar, or draw small Christmas elements around the cards with a permanent marker.
Ideas for Filling the Advent Calendar with Children
Once the support is complete, one of the most important parts comes: deciding what to put inside each box. It doesn't all have to be candy; you can combine candies, loving messages, and family activities to have something different every day.
Some suggestions for material surprises you can put inside:
- Coins or small chocolates.
- Candies, jelly beans, or mini cookie packs.
- Christmas stickers for them to decorate their drawings or notebooks.
- Mini toys (plastic rings, small figures, stamps, etc.).
- Erasers, colorful clips, or small school supplies.
In addition to the items, you can also add cards with Christmas activities and tasks. This transforms the calendar into a much more active and educational experience. Some suggestions you can use are adapted from activity calendars used by other families:
- Make a Christmas craft with a toilet paper tube (for example, a reindeer or Santa Claus).
- Set up the Christmas tree and let the children hang some ornaments.
- Go outside to see the Christmas lights in your city.
- While eating a polvorón, say "Merry Christmas", trying not to laugh.
- Watch a Christmas movie with the family and eat popcorn.
- Prepare decorations for the house (ornaments, stars, table centerpieces…).
- Learn and memorize a Christmas rhyme.
- Make a Christmas card for a loved one.
- Try to draw a snowman with your eyes closed.
- Do a Christmas puzzle together.
- Write a letter to Santa Claus or the Three Wise Men.
- Try a simple Christmas origami figure (like a tree or star).
- Taste a special chocolate that day.
- Organize a small Christmas karaoke at home.
- Have a board game session with the family.
- Hold a small joke session or Christmas humor session.
- Try doing Christmas-themed face painting.
- Make cookies or cake with the family.
- Draw a picture of Santa Claus or Rudolf.
- Tell a Christmas story before bed.
- Write a message for Santa Claus or the Three Wise Men and leave it under the tree.
- Go for a walk in the neighborhood with the family.
- Make a Christmas craft with foam eva, like another decorative figure.
- Send your Christmas wishes that day (to neighbors, friends, family…).
- Give hugs and kisses to your loved ones.
If the calendar is to be used at school or with a group of children, a very nice idea is for each box to contain a child's name and, in addition to the surprise, for that child to write an anonymous wish for the group. At the end of the term, everyone can open and read together, promoting the values of brotherhood and empathy.
Other Creative Ideas for Advent Calendar with Cardboard
If you liked this project but want to explore variations with cardboard and foam rubber, there are other ideas that you can easily adapt using the same pocket and decoration technique:
- Tree-shaped calendar: instead of a rectangular panel, cut out a large tree from cardboard and hang the cards like ornaments. You can add a star made of glittery foam rubber to the top.
- Santa's house: design a cardboard house with a snow-covered roof and use the cards as small windows and doors.
- Circular calendar: arrange 25 elements in a circle around a central figure (a reindeer, Santa Claus, a snowman…) and place an activity or surprise at each position.
- Group calendars for sharing: in classrooms or large families, you can prepare larger cards and place a chocolate coin for each child inside, allowing one box to be opened each day.
These types of projects are quite flexible: you can use recycled cardboard, adjust the size according to the available space, and play with the design to find the one that best suits your children or students.
And here it is, our Advent Calendar made with foam rubber and cardboard is complete. This is an easy, economical, and highly customizable craft to spend quality time with children, encourage creativity, and experience a little magic every day in December. If you decide to make it, adding activities and small gifts to each card opening would be a great detail to make each moment unforgettable.
If you decide to make it, don’t forget to send a photo to one of our social media accounts to see your result. It would be great to see your result and share your ideas!


Comments
(9 Comments)