Light, flaky, and with that wonderful aroma that spreads while baking, homemade puff pastry is a delicacy that should be prepared at least once in your life. The process is as fascinating as the results; seeing how a seemingly simple dough transforms into hundreds of layers is pure kitchen magic.
Although it may seem intimidating at first glance, puff pastry is not a secret reserved for professional pastry chefs. Yes, it requires time, patience, and a bit of organization, but with quality ingredients, controlling the temperature, and understanding the folding and resting system, you can achieve fantastic puff pastry for all kinds of sweet and savory recipes: from palmiers to millefeuille, quiches to fruit tarts, or savory snacks that will impress your guests.
What is Puff Pastry?
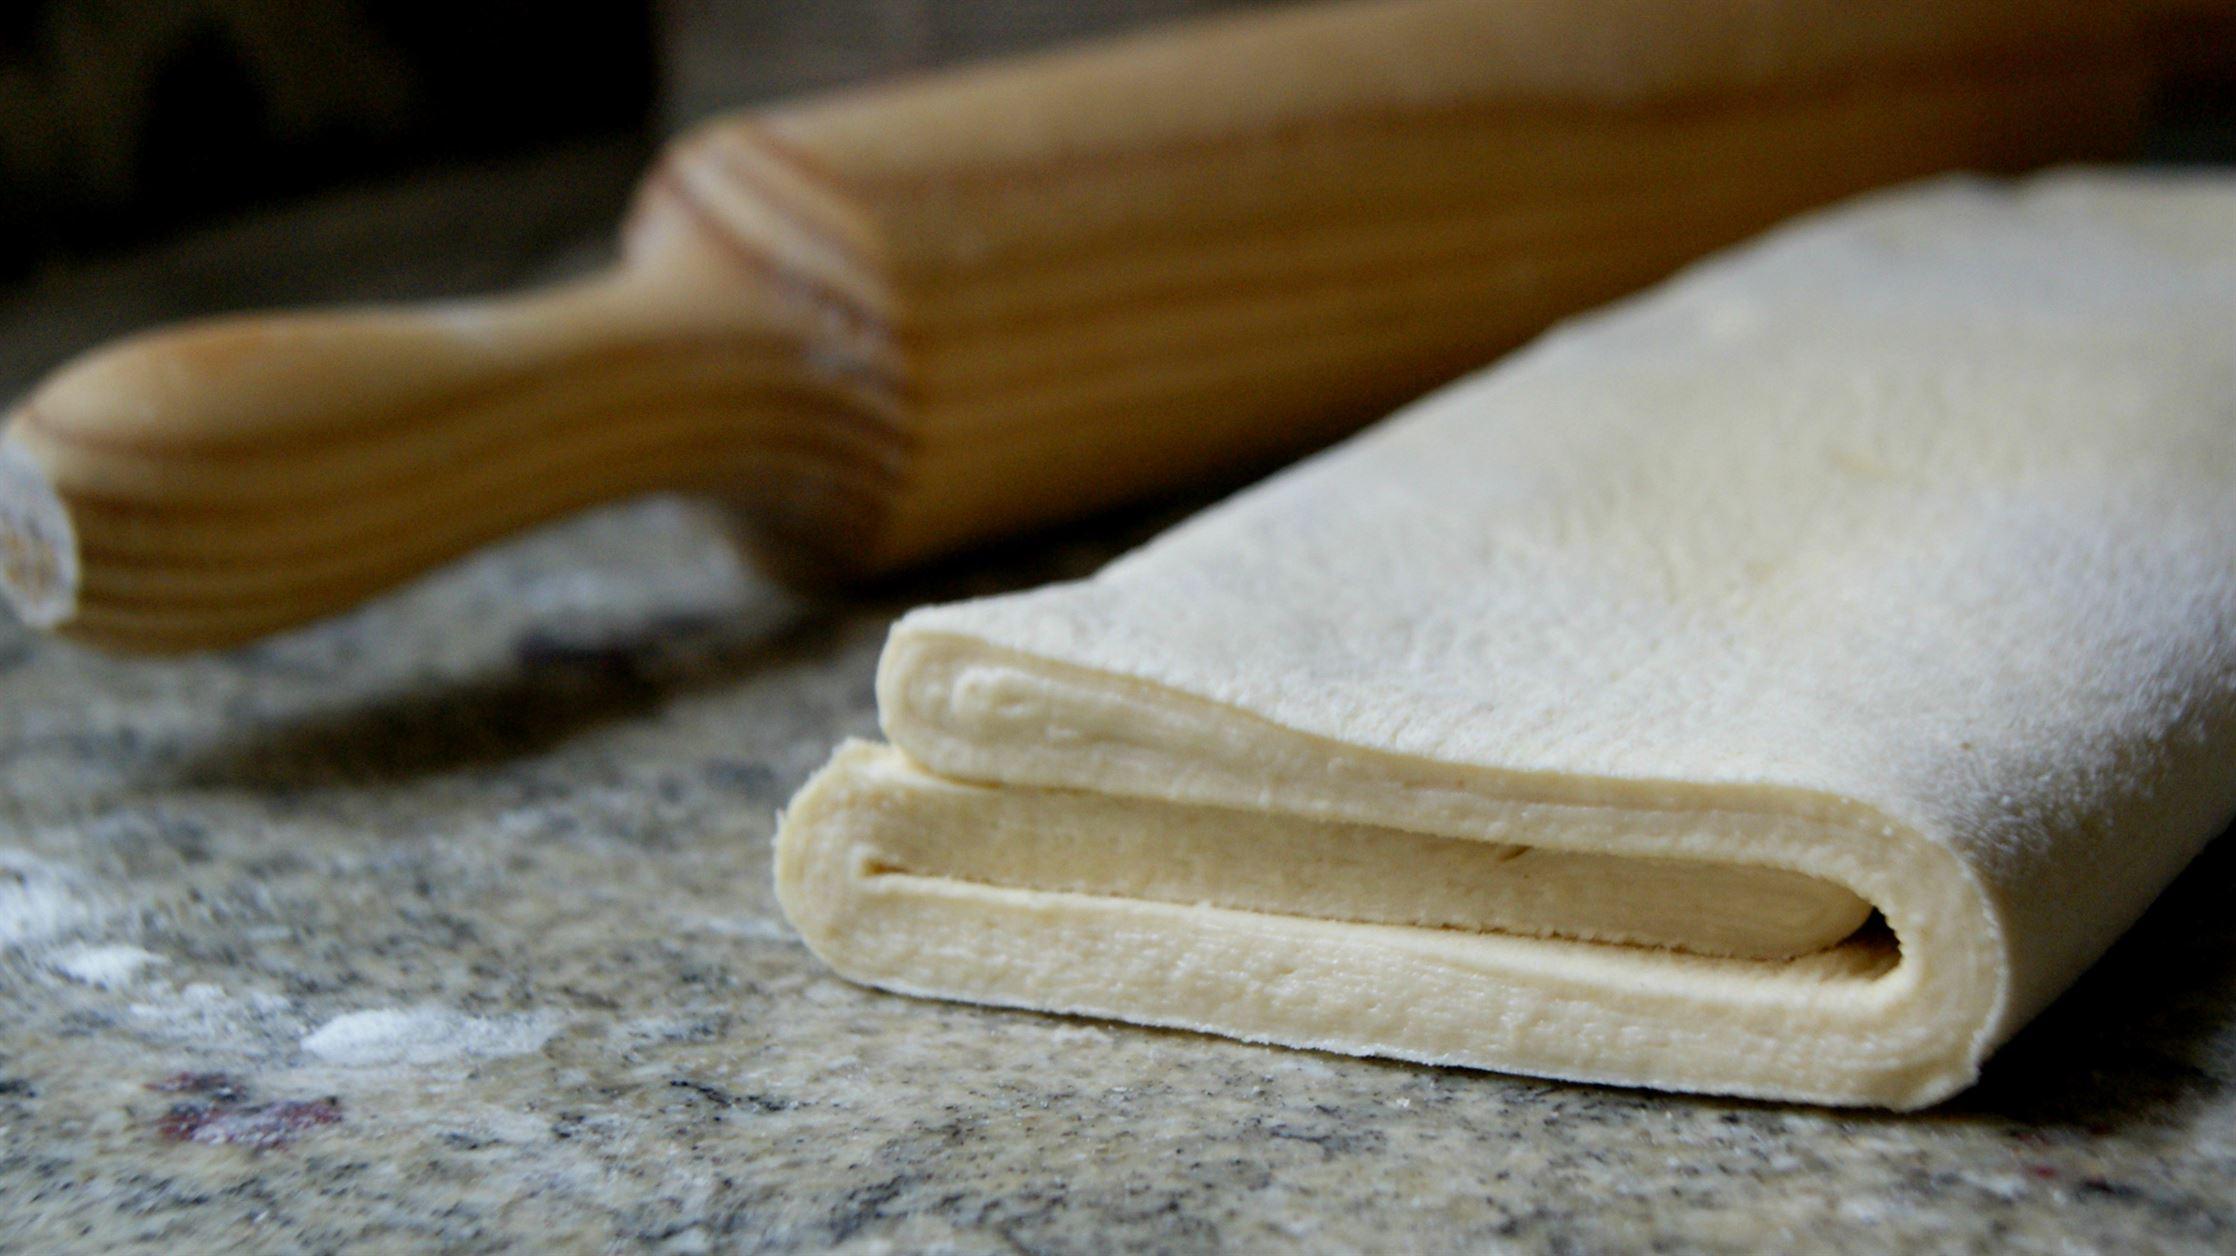
Puff pastry is essentially a preparation made of flour, water, salt, and fat (usually butter); it does not contain chemical or bread yeast. Its characteristic feature is that it consists of thin layers of dough and fat stacked on top of each other; during baking, they separate like pages.
To achieve that characteristic texture, a dough (basic dough made of flour, water, and salt) is prepared first, and a block of fat (prepared for lamination) is made as well. Then, the dough is rolled out, fat is added, and several folds are made; the dough is rolled and folded repeatedly. With each fold, the dough and butter layers increase, allowing the puff to form.
During baking, the water inside the dough evaporates. When trapped between the layers of fat, this steam pushes the dough upward, separating the layers and creating the volume and crisp texture we see in a good puff pastry. Butter not only helps lift the dough but also provides a rich and delicate flavor that cannot be replicated with low-quality industrial doughs.
It is important to distinguish puff pastry from other doughs that do not create layers and contain more fat; for example, quiches or savory tarts. A flaky dough has a fine and sandy texture; whereas puff pastry is light, layered, and very crispy; it has a visible structure when broken with your hands or a knife.
Types of Puff Pastry and Fat Ratio
Not all puff pastries are the same. Depending on the amount of fat used and how it is integrated into the dough, true puff pastry is referred to as three-quarter puff, half puff, or quick puff. Each offers different flavors, textures, and behaviors during baking, and it is important to know them if you want to fine-tune your recipes.
True puff pastry contains an equal amount of fat to flour. So, if you use 1 kg of flour, you should use 1 kg of butter or fat. This is the richest puff pastry and typically provides an extremely layered texture and intense buttery flavor; it is ideal for recipes where the puff itself takes center stage.
Three-quarter puff pastry is made with three-quarters of fat for each part of flour. For example, 750 g of butter is used for 1 kg of flour. This is still a very rich puff pastry, allowing for good layer development and a certain economy of fat; it is often used in professional pastry for pieces that require sturdiness and good rise.
Half puff pastry is made with about 500 g of fat for every 1 kg of flour. It creates fewer layers than the previous ones, but it is still very useful for tarts and recipes where the filling stands out more than the dough itself. Additionally, it is easier to handle and may be simpler for beginners.
Besides the fat ratio, the method of incorporation is also important. The fat is referred to as French puff when it wraps the dough, inverse puff when the fat wraps the dough, and quick puff when all ingredients are combined into a dough from the start.
Traditional Puff vs Quick Puff
In the world of puff pastry, it is important to distinguish between classic layered puff (with a distinct fat block) and quick puff. Quick puff aims to reduce time and complexity, but the appearance may be slightly less perfect.
In traditional puff pastry, a basic dough (détrempe) is first made, then a block of butter is prepared, which is enclosed in the dough, and a few simple or double folds are made. This process creates very thin and regular layers; it forms a distinct puff pastry, ideal for vol-au-vents, millefeuille, and perfectly looking pastry pieces.
Quick puff pastry, on the other hand, is made by mixing flour, cold butter pieces, water, and salt at the beginning. A distinct fat core is not formed; the butter is distributed in small pieces within the dough. Nevertheless, folds and roll-outs are made, but the result has a more rustic appearance.
Visually comparing traditional puff pastry and quick puff pastry, traditional puff pastry has more regular layers; there are very clear lines between the dough and the butter. Quick puff pastry is also layered, but its structure appears a bit coarser; still, it offers a distinctly layered and very appetizing result, especially when time is limited.
This type of quick dough is ideal in hot weather or when the kitchen is very warm; working with a large block of butter becomes nearly impossible. Additionally, it is a great option for savory tarts, quiches, böreks, and palmiers; where thin pastry layers are not needed, but that characteristic crispy texture is essential.
Main Ingredients for Perfect Puff Pastry
Homemade puff pastry may seem technically complex, but it actually relies on very simple and economical ingredients: flour, water, salt, and fat. The difference between a medium-quality puff pastry and a perfect puff pastry lies in the quality of these ingredients and how they are processed.
Butter is the real star. It is important to use a good quality, high-fat content, and unsalted butter (you control the salt). The better your butter, the better the taste and texture of your puff pastry will be. If you are using cheap butter or butter with too much water, it is likely that the layers will break down or the result will be less crispy.
Regarding flour, many recipes combine regular flour or pastry flour with strong flour. This mixture gives the dough flexibility and structure, preventing it from becoming too stiff. For example, recipes containing 250 g of regular flour and 250 g of strong flour are common; or if a more delicate puff pastry is targeted, only pastry flour can be used.
Water should be at room temperature or slightly warm; depending on the recipe's requirements, it is added gradually and mixed until a non-sticky, elastic dough is obtained. Salt is important not only for flavor but also because it helps strengthen gluten and control the texture of the dough. In sweet puff pastries, a small amount of sugar can be added to balance the flavors.
In some recipes, a small amount of melted butter is added to the dough (in addition to the butter block used for lamination). This fat within the dough adds lightness and makes rolling easier. However, most butter is kept in a compact block to create the layers.
The Importance of Temperature and Patience
Working puff pastry well is a matter of achieving a balance between cold and flexibility. The butter should be soft enough to roll out without breaking the dough, but not so soft that it escapes from the edges and becomes creamy.
When handling the butter block, the best result is to start with cold butter from the refrigerator; it is placed between two pieces of parchment paper and pounded until it takes the shape of a rectangle about 1-2 cm thick. This pounding not only shapes it but also allows the butter to gain flexibility, avoiding overheating.
After forming the block, it is cooled again (for at least 30 minutes) so that it maintains its shape well. Then, it is integrated into the basic dough, and the folding process begins. After each two folds, the dough (plastin) usually needs to rest in the refrigerator for 20-30 minutes; resting longer in hot weather is important to prevent the butter from melting.
The importance of patience is great: a good puff pastry is built by changing the working times and cold resting periods. If you try to speed up the process, trying to open for too long or skipping rests can cause the butter to become uncontrolled, leak out from the edges, or mix into the dough, resulting in the loss of layers.
In summer or in kitchens with high temperatures, it is best to avoid traditional puff pastry making or to work very quickly while being close to a cold source. If you feel that the butter has become too soft, it is best to stop, wrap the dough in cling film, and put it in the refrigerator; this way, you ensure that the butter cools down before continuing.
Creating Layers: Folds and Pleats
When the dough and butter are ready, we move on to the most technical part: lamination. When the butter is trapped inside the dough, it is often referred to as a plaston. On this plaston, folds are made; these folds are responsible for multiplying the layers.
There are many types of folds: half fold (folding the dough in half), simple fold (folding one end towards the center and covering the other end, like a tri-fold), double fold (folding the ends towards the center and then folding it again in half), and multiple folds (similarly but with more folds on both sides). In practice, the most commonly used fold in home recipes is the simple fold.
Puff pastry, referred to as "flower," typically contains five to six simple folds. This type of lamination is suitable for recipes that require significant rising in the oven; such as vol-au-vents, tortellini, high-volume fruit tarts, or multi-layered millefeuille. Each fold adds layers to the dough.
The standard procedure is generally as follows: the plaston is rolled out into a rectangular shape, excess flour on the surface is brushed off, and a simple fold is made. Then, the dough is rotated 90º and always rolled out in the same direction (usually to the right) and another fold is made. After two consecutive folds, the dough is usually wrapped and rested in the refrigerator so that it rests and the butter hardens again.
In total, many recipes suggest six simple folds; these are distributed in three groups with cooling periods in between each. In other versions, 5-6 folds are combined in three blocks; it should always be ensured that the dough does not break and that the butter does not leak out when pressed with the rolling pin.
Step-by-Step Traditional Puff Pastry Recipe
One of the most common recipe schemes for homemade puff pastry includes approximately 500 g of flour, 250-350 ml of water, a small amount of melted butter (about 60 g), an important block of butter for lamination (350-400 g), salt, and if it is sweet puff pastry, a teaspoon of sugar.
First, the basic dough is prepared. In a large bowl or the bread machine's bowl, water, salt, a small piece of butter, and flour are placed. It is mixed until a homogeneous dough is obtained; this process is done by hand or with a mixer hook for about 10-15 minutes, and the dough should be elastic, smooth, and not sticky. It is formed into a ball, a plus sign is made on top to facilitate rolling, it is wrapped in cling film, and rested in the refrigerator for 30 minutes to 1 hour.
While the dough is resting, the butter block is prepared. Cold butter blocks are rolled out, placed between two sheets of parchment paper, and beaten with a rolling pin to form a rectangle about 1-2 cm thick. Care should be taken not to make it too thin or too thick. This block is wrapped again in parchment paper and kept in the refrigerator for at least 30 minutes to ensure it hardens.
When the resting time is up, the basic dough is rolled out on a lightly floured countertop; it is shaped into a cross with a slight height in the center. The cold butter block is placed on this height. Then, the "petals" of the dough are folded over the butter, closing it like an envelope or package to ensure the butter is completely trapped inside the dough.
After the plaston is formed, rolling out begins with the rolling pin; a rectangular shape is created with quick and firm movements. It may be a bit difficult at first because the butter is hard; it is helpful to make a few light taps with the rolling pin initially to "wake up" the butter block. Before each fold, excess flour on the surface should always be removed; this way, the dough does not absorb too much flour.
Rolling, Folding and Resting Cycles
Once the dough is rolled out, the first simple fold is made: one end of the dough is brought over the center and the other end is folded over it, as if closing a tri-fold. In this way, several layers are created on the dough and butter, which is counted as the first fold.
Then the dough is turned 90º to the right, the work surface is lightly re-floured, and it is rolled out again into a long rectangle. The same folding process is repeated three times; now two simple folds have been made. At this point, the dough is usually wrapped in cling film and it is recommended to rest it in the refrigerator for 30 minutes; this way, the butter firms up again.
After this first resting, the dough is taken out of the refrigerator and the process is repeated: rolling, simple folding, turning, rolling out again, and another folding. Thus, a total of four simple folds have been made. Again, it is best to wrap the dough and rest it for another 30 minutes; this ensures that the lamination stays intact and the butter does not melt under the rolling pin.
Finally, the third folding block is made: it is rolled out again, folded in three, turned, and repeated once more. Thus, the necessary five or six folds for a well-developed puff pastry are completed. Once the process is finished, the dough is allowed to rest or is divided into portions, wrapped well in cling film, and frozen.
Throughout this process, it is possible for the butter to show from the edges or surface. If it does, there is no problem: a little flour can be sprinkled on it and work can continue; if the problem is significant, it is best to rewrap the dough and put it in the refrigerator for the butter to cool; this way, you can continue.
Homemade Puff Pastry: Baking and Using Leftovers
When your puff pastry is ready, the next important point is baking. For the puff pastry to rise properly, it is necessary to cut the pieces with a very sharp knife or a clean cutter. Crushing or "sealing" the edges can cause the layers to compress and not rise well in the oven.
The oven should be preheated to a high temperature (usually between 200-220 ºC depending on the recipe and piece size). The dough should go into the oven cold; even resting for a few minutes in the refrigerator on the baking tray after cutting is beneficial to help the temperature difference allow the puff pastry to rise evenly.
Care should be taken with leftovers. All pieces remaining after cutting can be reused, but it must be done carefully: instead of kneading the dough again, it is enough to stack them on top of each other and gently roll over them with a rolling pin; it is important to preserve the layers as much as possible.
With these pieces, small sweet or savory snacks can be made: sugar-sprinkled strips, savory sticks topped with grated cheese, quick palmiers, or bases for canapés. Generally, puff pastries made from well-utilized leftovers rise even more than the "official" pieces; because they have undergone more folding during production.
If you are not going to bake the puff pastry immediately, you can divide the dough into two or three pieces, wrap them individually in cling film, and freeze them. They can be stored without any issues for a few weeks or even months; they can be taken out to thaw and used like purchased sheets; however, the taste and texture are far superior.
Freezing and Storing Puff Pastry
One of the biggest advantages of homemade puff pastry is its excellent freezing capability. Both traditional and quick puff pastry can be prepared in bulk, divided, and stored in the freezer; thus, you can always have ready-to-bake dough without repeating the entire process.
Many recipes state that the dough can be stored frozen for one to six months; it should always be well wrapped in several layers of cling film or stored in a freezer-safe airtight bag. Ideally, it should be portioned into manageable sizes (for example, blocks to obtain 250-500 g sheets) and labeled with the date.
To use, it is sufficient to let it sit in the refrigerator for a few hours after taking it out of the freezer; or it can be left at room temperature for a while depending on the thickness of the block. When it is flexible but still cold, it can be rolled out to the desired thickness and used in the recipe you have in mind; it can be sweet or savory.
If you are fond of puff pastry, it is beneficial to set aside a day to get organized and prepare traditional or quick puff pastry; this way, you can freeze well-layered puff pastry and store it in portions. This way, you can make palmerits, tarts, böreks, or snacks at any moment; you won't have to buy industrial-quality sheets that are questionable.
Keep in mind that some commercial doughs, especially in certain countries, create almost no layers and have a more fragile dough texture rather than puff pastry. There is a significant difference in taste and lightness compared to a well-made homemade puff pastry; therefore, it is truly worthwhile to fill your freezer with your own dough.
Sweet Uses of Puff Pastry
When you have good puff pastry in the refrigerator, the range of sweet recipes is almost endless. One of the most popular preparations is puff pastry palmerits; these are made by wrapping the dough in sugar and baking it until caramelized and golden brown.
Another classic recipe is the puff pastry apple tart; here, the dough is placed as a base, covered with thin apple slices, sugar, and a bit of butter, and baked until the fruits soften and the pastry turns golden. This is one of the easiest and most satisfying fruit tarts to make and shows off the lightness of the dough very well.
Additionally, millefeuilles filled with cream, whipped cream, truffles, or various combinations can also be prepared. In this case, thin layers of puff pastry are baked, cooled, sliced, and assembled with alternating layers of cream and puff pastry to create an impressive, crispy dessert typical of French and Spanish patisserie.
Other classic desserts include filled cones, bayons, some local sweets, creamy or cream-filled puff pastries, and several local flavors: ties, miguelitos, polkars, sacristans, and many more desserts where puff pastry serves as a crispy base.
Even without large preparations, simple puff pastry strips sprinkled with sugar or a bit of cinnamon can become a snack with a crispy exterior and soft interior; they make a great accompaniment to coffee or hot chocolate on cold days.
Savory Preparations with Puff Pastry
Puff pastry is not just for sweets; it works wonderfully in many savory recipes. One of the most well-known is volovan (vol-au-vent); empty baked small or large puff pastry baskets are then filled with sauces, meats, seafood, vegetables, or creamy mixtures.
Savory tarts or puff pastry-based quiches are also quite popular. You can line a mold with the dough, prick the base lightly, and then fill it with eggs, cream, and vegetables, cheese, bacon, or other ingredients to your taste. The result is a light tart that offers a very appealing contrast between the creamy filling and the crispy frame of the puff pastry.
Another simple idea is savory palmerits; these are prepared in the same way as the sweet ones, but the ingredients are replaced with pesto sauce, olive tapenade, grated cheese, or chopped ham instead of sugar. They make a very good appetizer, perfect for informal gatherings, easy to make, and quite eye-catching.
Puff pastry can also be used to make böreks, snacks filled with meat or vegetables, savory strudels, or vegetable tarts. In these cases, the choice between puff pastry with a richer fat content and half puff pastry can be adjusted according to personal taste; however, in every case, the result is much superior when homemade dough is used.
In many professional kitchens, homemade puff pastry is reserved for special preparations; however, at home, it is a great option on celebration days: a simple puff pastry braid filled with cheese and vegetables, baked until golden and crispy, elevates any meal without requiring complex techniques.
Puff pastry, whether the traditional layered version or the quick version, shows that you can achieve professional pastry results with basic ingredients and a little patience. Understanding how the layers form, respecting the cold resting times, and working with good butter and good kneading makes a difference compared to store-bought sheets. Once you have tried the crunch and taste of a well-made homemade puff pastry, it becomes almost inevitable to repeat this ritual on a quiet Saturday, fill your freezer with homemade sheets, and always have a perfect base for sweet and savory tarts, palmiers, vol-au-vents, and many other delights.


Comments
(3 Comments)